Dedicated to the art of creating custom bases for wargaming miniatures.
Thursday, August 25, 2011
Half Brick Easy Basing Tutorial
by Gareson
I often see, either on the gaming table or the internet, painted minis that are finished up except for basing. Now of course for the fanciest basing you'll really need to pre-sculpt or integrate the details ahead of time(see some of Adary's great articles on Just the Bases). However, if your mini is all painted up and glued onto the base, there are still some nice basing effects can you achieve "around" the planted mini. There's always simple basing with sand(see this article), but one of my favorites is something I call the "Half Brick" or "Ruined Road" effect. The concept here is that the base depicts a decayed roadway or tiled chamber which has eroded so that earth or dirt covers half of the base.
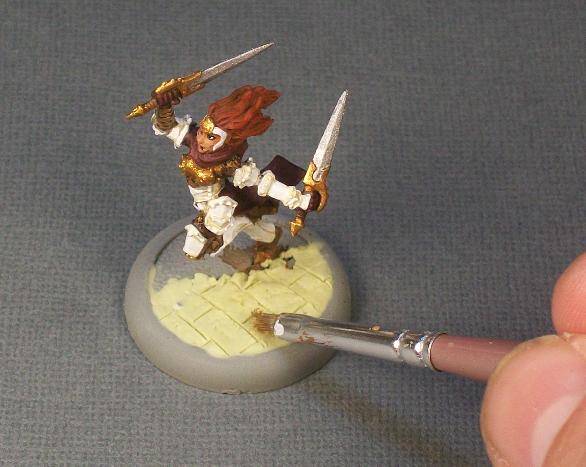
For this tutorial I am going to use a Daughter of the Flame mini from Privateer Press(Warmachine). She's all painted up(more or less) but needs a nice base. Now of course PP bases, as with most miniature companies, are black discs...mine only appears grey because I glued the figure onto the base before I used my grey primer:
In the pic above you can clearly see the indentation where the metal tab on the bottom of the mini inserts into the "slot" on the base. Obviously our basing effect will need to erase that(which it will).
Step 1: Creating the Brick(or stone) Effect
For this step you can use any number of materials to create your brick material. You can use Green Stuff(or any two part modeling putty), spackle(filler) or Vallejo stone texture effect. However, for this tutorial I will use my preferred material: Milliput.
I like Milliput because it is a simple two part putty that is easy to mix, work with, and, most importantly, dries and hardens fairly quickly. Within a couple of hours of mixing and applying the Milliput you can paint over it(something like Green Stuff would take longer).
I mix up a little bit of Milliput and I apply a small ball to the base on the side where I want the brick. Now certainly you could carefully work around the mini's feet and do the entire base in 'brick', but again, I'm doing a "Ruined Road" style. With your finger and/or the flat side of an x-acto knife blade, work the Milliput into a flat shape that covers roughly half the base. I would suggest wetting your fingers or knife blade with a little water because the Milliput is a little tacky.
You'll notice that I've not completely covered the slot on the base; this is not a problem because our sand texture will take care of that later.
Now I take my x-acto knife and cut vertical lines in to establish the rows of bricks...making the lines roughly parallel and equidistant from one another. Try not to push too hard all the way to the base as you carve these lines as you could cause the Milliput to shift and separate...just gently scribe in the lines.
Now I have gone back with the knife and etched in the horizontal(well really they are at a 45 degree angle in the photo) lines to create the separate bricks of this road(or chamber floor). At this point the brick effect looks pretty good but to create a little more of a rough stone or weathered effect...
I use and old drybrush and lightly stipple indentations into the Milliput surface. I can also make larger dents, or even cracks, with the x-acto knife. The photo doesn't show it on this bright Milliput, but there are some nice surface irregularities that will show up layer with a wash(see below).
Step 2: Painting the Bricks
Painting the finished bricks is easy! Now usually when I am doing this type of basing I depict grey stone or red bricks, but for this mini I want something that looks somewhat more arid as is the setting where you'll often find the Protectorate of Menoth units operating so I will be working with tan.
After a couple of hours after applying the Milliput(with a little help from hot lamps), I basecoat the brick surface with Reaper's Tusk Ivory from their HD series of paints(any light tan would do the same thing). The wet paint above is not very visible, nor are the brick details, but we'll fix that with the next step.
After the basecoat is completely dry, I thin down(with water) some Sepia Ink from Vallejo's Game Colors line. I generously apply this over my bricks and make sure the entire surface gets this wash. The details in the bricks are starting to pop now...including the irregularities that we stippled in. You could go back and drybrush on your basecoat color to highlight the raised details(or even line/block in some shading), but we'll keep it simple here. Of course if you were simulating grey stone bricks I would suggest a light grey basecoat followed by a black wash.
Step 3: Sand Texture
Well, as this is a "Half Brick" base effect we need to do something with the other half. We're going to apply a simple dirt texture using sand. For a thorough tutorial on this simple basing technique you can see this article(which includes a video). However, so we can be thorough here, let's do a quick walkthrough....
After the brick "wash" has completely dried, take watered-down glue(or Mod Podge is my preference) and apply it to the other half of the mini's base. Make sure you not only cover the entire non-brick side, but that you overlap a little and apply some adhesive over the edge of the brick(as shown above).
Dip your miniature in sand, blow off any loose grit, and now you have texture on the other half of your base.
Step 4: Paint the "Dirt"
After your sand has dried you can quickly paint it up to look like dirt.
I use a simple approach of (1)Dark Brown Basecoat (2)Dark Tan Highlight and a (3)Light Tan Highlight. In the pic above you can see the three particular paints I used(P3 Battlefield Brown, Beast Hide and Menoth White Base)...but any substitutes would work just as well. The highlights were simply applied used dry-brushing to bring out the texture of the sand(dirt).
Step 5: Paint the Base Lip
Well, with all that Milliput, sand and paint, the lip of your base needs to be cleaned up to finish your model(especially as mine was primed grey as previously mentioned). At this point you want to find a nice black(I like Reaper Pro Series Faded Black) and paint the lip or round edge of your base. It's not shown here, but I attach my mini to a temporary stand(poster putty on top of an old paint pot) so I can get all around the base neatly.
In the end, here is the final effect...
Now the tutorial above may make this seem like a long process but to be honest it is quick, easy and painless. I personally think its a great way to give an already painted and mounted miniature a respectful base with a little something beyond just dirt texture. In the end you could add a little foliage or moss to the base...but I like the simple, desolate look of the base as is in most cases.
***Update*** Added a three part video tutorial for the effect above...
(double click on videos to enlarge them)
I hope you found this tutorial helpful and can make use of it in the future...thanks for reading/viewing! Happy Wargaming Everybody,
~Gareson


Fantastic tutorial! Thank you so much for the tips.
ReplyDelete